

For Assistance Contact:
Catherine Buckalew
catherine.buckalew@scouting.org
Colleen Heuser
colleen.heuser@scouting.org
Event Blueprint Process
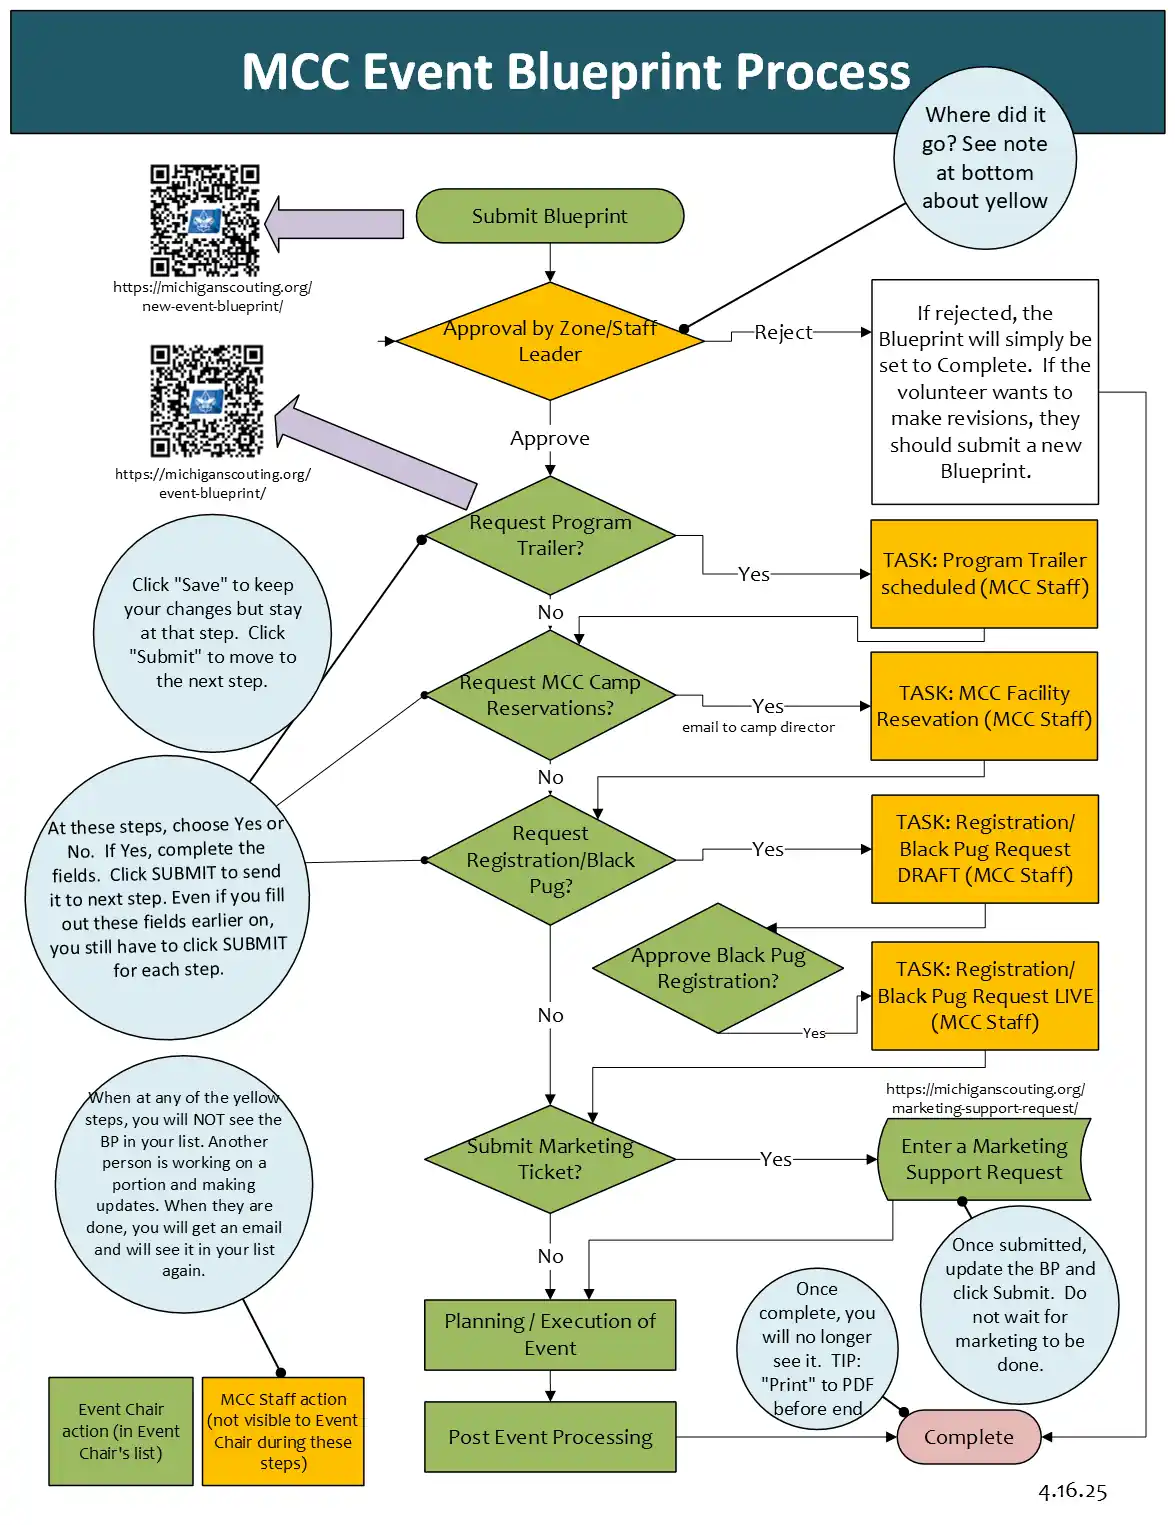
The Event Blueprint Process is detailed on the following image.
REMEMBER:
- Click Submit to move it through the process. Click Save to keep it at the same step (and just save any changes you made)
- You will only see it in your list when it is currently at a process step assigned to you (by default the only person that sees the Blueprint is the person that submitted it. If you need additional people to see it in their list, make sure to choose their user accounts in the Additional User with Access (e.g., the Event Chair or Co-Chair) and Second Additional User with Access (e.g., the Staff Advisor/Professional) fields at submission.
- You can't move it to any other step except forward. (That's ok. It is a blueprint, meant to guide you. Not be something restrictive. You can update various fields from past steps, but in the most part this process is sequential — for a reason: you need facility rental before Black Pug, and you need Black Pug before you can put in a Marketing request. If you pass the Black Pug, Facility or Program Trailer step and decide to change your mind, there are standalone forms you can complete. The Event Blueprint will not go back to that step.)
For more details, see the Event Blueprint Volunteer Guide.
Click image to open in full window
This Event Blueprint Video, about 20min in length, discusses the new Event Blueprint system from the eyes of an Event Chair. It talks about the new system, and then walks through an entire event, showing the interaction that a volunteer can expect. STRONGLY encourage everyone to watch prior to using the system.
FAQ
Q – Where is my blueprint? I don’t see it in the list?
In the Blueprint List, you will find Event Blueprints that have been submitted and are actively waiting for information from you. If you have indicated that you need a Facility Rental, Black Pug/Registration, and/or Program Trailer, at those steps your Blueprint will be assigned — and only visible to — the teams that handle those steps. Once they complete their work and update the Blueprint, you will receive notification and will see it in the list below.
By default the person that enters the Blueprint will be the ONLY person to see it in their Blueprint list. If you want an additional volunteer and/or your staff advisor/professional to be able to see it (and modify it), then you will need to choose their user accounts on the initial submission form (Additional User with Access and Second Additional User with Access fields). You cannot yourself add people after submission. Your staff advisor/professional can do it, or you/they can reach out to Event Blueprint staff for assistance.
Q – What if I am not ready to submit the Blueprint? Can I come back to one I have started?
Yes. On the initial Blueprint Submission form, at the bottom are both a “Submit” button and a “Save and Continue Later” button. The Submit sends it off into the process, while Save/Continue allows you to come back to this initial form and finish it later.
If you click “Save and Continue Later”, you will be prompted to enter your email address. This email address will receive an email with the link in it. That, and the link that pops up on that screen are your only way back into the Blueprint. It will not show up in your queue or be accessible in any other way. Please make sure to save that link.
See images below:

click to expand image
Buttons at the bottom of the submission form
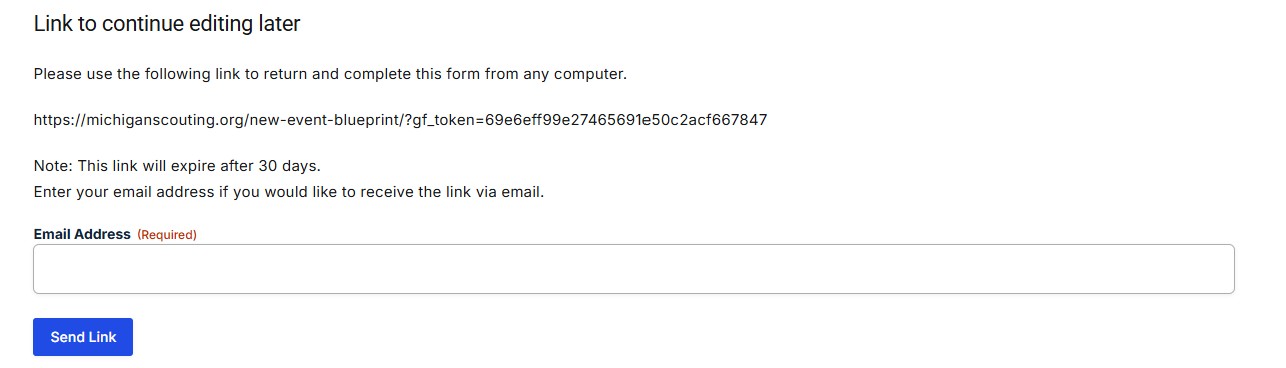
click to expand image
Save and Continue Later button option
Q – Can I change the columns that show in the Event Blueprint List? Show my event name, for example?
Unfortunately not. The columns that show in the EB list are system locked. This system is used for other workflows as well, each with its own set of fields. The general fields are the only ones available.
Q – I need to go back in the process. How do I do that?
You don’t. This is a blueprint, and it is meant to move forward only. Just because it is at step 5 doesn’t mean you can’t go back and refine step 2. The “step” listed on the Blueprint isn’t as important as the great work you are doing. Do what you need to do when you need to do it. The Blueprint is a guide. That being said, see the next question about making requests for the Program Trailer, Facilities and Registration links.
Q – What if I don’t indicate that I need the Program Trailer, MCC Facility Rental, and/or Black Pug/Registration before that step in the process? How do I go back and request it?
Once you’ve passed that point in the process, you will have to submit the requests outside the system. The following links are ONLY to be used if you changed your mind later in the process.
Q – What if I indicate that I need the Program Trailer, MCC Facility Rental, and/or Black Pug/Registration before that step in the process? Why do I have to keep coming back and clicking “Submit”.
You are welcome to fill out as much as possible of the Event Blueprint early in the process, but you still need to walk through the steps in order. You may fill out the three “requests” during the Budget/PHA stage, but it will still stop at the “Request Program Trailer” at that step, wanting you to confirm the request and click Submit. Your needs may change as the requests go on.
Note: If you do choose to select “Yes” to any of the three “requests”, those fields are immediately made required. If you do not know all the answers, you will have a change to revise them at that request stage. If you decide you don’t want to fill them in early, simply set the “Do you need…” back to No temporarily.
Q – What happens to my Blueprint when it is Completed?
You will no longer see it in your list after it has been closed. Your district executives and others will have backend access, but you will only see those Blueprint that are currently in flight.
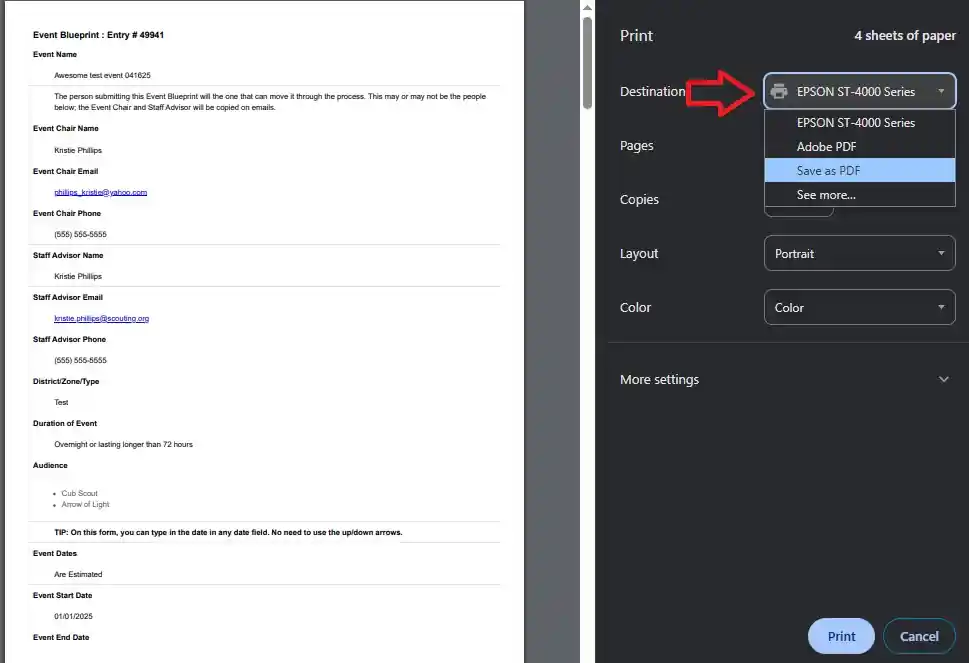
TIP: If you want to keep records of your blueprints for the future, you can “Print” to PDF. On the Blueprint, under the Save/Submit section on the right, you will see a “Print” option. You can click that. If your computer is set up with a “Save to PDF” option, we suggest you use that. Then you will have a PDF version of your entire process, including the timeline/notes.
Q – I have a Project Charter already submitted and in process. Do I need to resubmit here?
Nope. That system will allow all current charters to finish up. If you have multiple events you are running, you may need to work between the two systems. That being said, if you have a Project Charter that is early in the process and your event is not for a while, you are welcome to recreate it here. Simply note on the Project Charter that you are transferring it so that it can be closed/cancelled on that site.
Q – How to I save a copy of my Blueprint?
At any point in the process after submission (that you have it in your queue), and particularly at the end, it would be useful to save your information for future reference. You can do this by using the Print option. When on your blueprint, you will find a Print button below the Save/Submit option. This will open your computer’s print dialog. You can print to an existing printer, or if your computer has a Print or Save to PDF option installed, you can save it as a PDF. By checking the Include Timeline checkbox, you will also print the history that is located at the bottom in the timeline section.

click image to zoom
Q – My event spans multiple weekends. How do I request that?
On the initial submission, there is a “Event Dates” field. Choose the “Are Non-Continuous (multiple weekends/weekdays)” option. For the “Event Start Date“, enter the first date of the first weekend/session. For the “Event End Date“, enter the last date of the last weekend/session. Then describe the event dates in the “Non-Continuous Date Description” field. E.g., if Woodbadge is Feb 1-3 and Mar 4-5, choose the Non-Continuous option, enter Feb 1 as the start, Mar 5 as the end, and put “two weekends, Feb 1-3 and Mar 4-5” in the “Non-Continuous Date Description” field.
Q – Who will approve my Event Blueprint after I submit it?
If you chose a District or Zone as the District/Zone/Type, then the Zone Leader will approve your Blueprint (you can find those leaders on the Staff Directory page). Otherwise the staff professional for that category will receive the approval. It is NOT necessarily the Staff Advisor/Professional you chose at submission.
MCC NYLT: Ryan Kriesch
MCC Wood Badge: Aaron Craig
MCC University of Scouting: Patrick Higgins
MCC Mac Rendezvous: Aaron Craig
MCC Rendezvous in the D: Patrick Higgins
MCC Council Sea Base Contingent: Abel Rubio
MCC Operations Rendezvous: Denver Laabs
MCC Scouting for Food: Catherine Buckalew
MCC Other Training: Abel Rubio
MCC Council-wide Other: Catherine Buckalew
Q – Should I be receiving emails?
Yes. At each step change in the process when it returns to your list/queue, you will receive an email. If you are not receiving them, you may need to configure your email to not block/mark them as spam. You can do that by adding “communications@michiganscouting.org” to your email accounts “safe senders” list or the equivalent. Sometimes it is as easy as adding that email address as a contact. Each email system has a different way to do that, but the more common systems:
Google – Add to contacts
Hotmail/Outlook Safe Senders
Yahoo – Mark emails as Not Spam
Q – Who do I contact if I have questions?
If you have questions about your EVENT or how to use the Event Blueprint, contact your Staff Advisor/Professional or District Executive team (the person that approved your event).
If you have questions about the overall PROCESS, you can contact Catherine Buckalew.
If you have questions about the TECHNOLOGY/LOGIN, you can contact MCC Marketing.
